Illustrated guide
Each step shows the real screen. For a quick answer to a question, use the help chat.
Watch the how-to videos
Short videos with a spoken English walkthrough and on-screen captions. Each one shows the real screens, step by step. For voice cloning and talking avatars, see the Froyla CloneVoice help.
1. Getting started
Sign in with your email: a code is sent to you. The Dashboard is where you set up your brand once (business name, website, a short description, colours, a logo and photos) and then request videos.
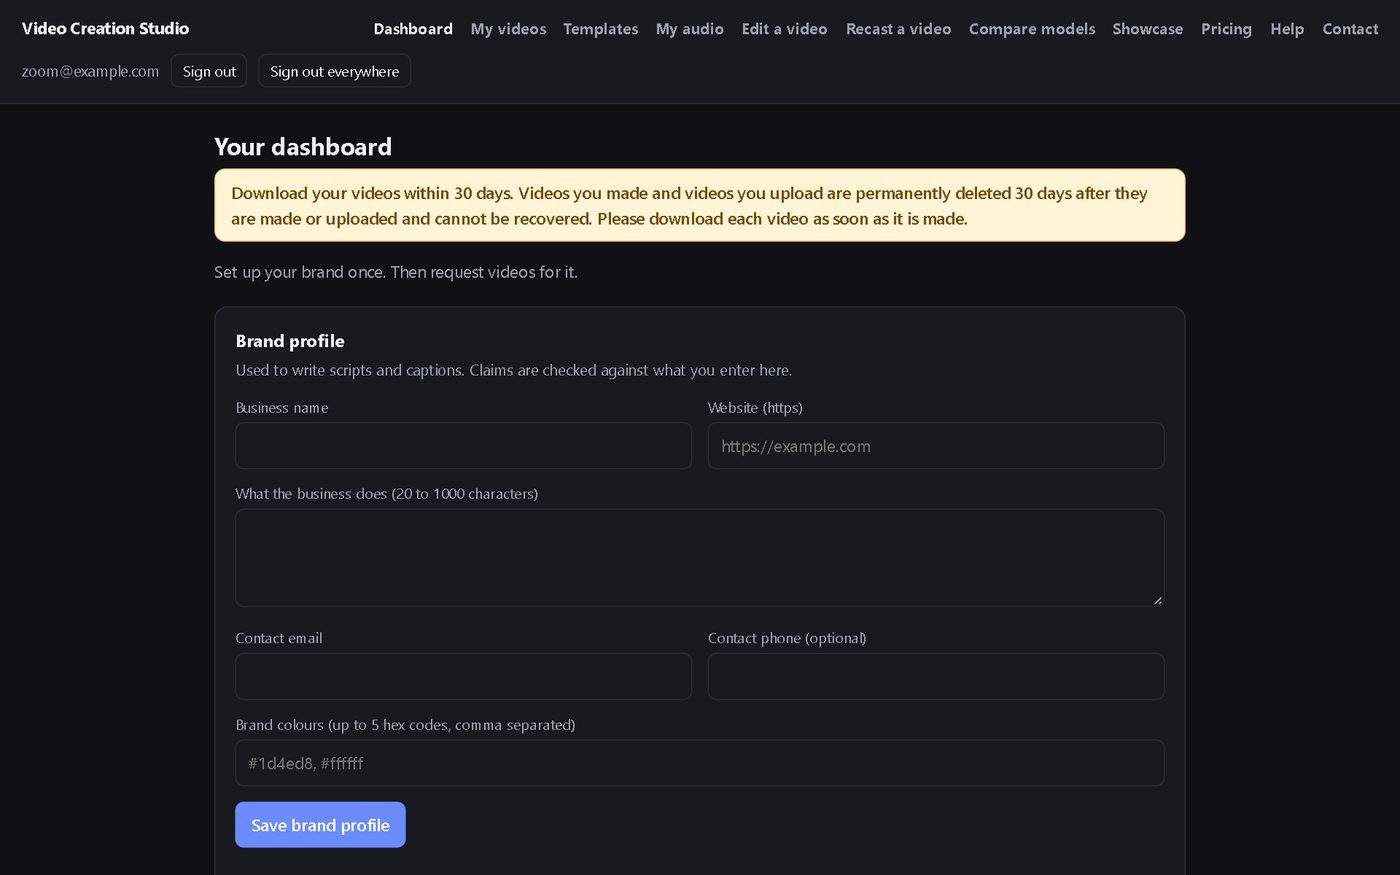
- Fill in your brand profile and press save.
- Upload your logo and up to 5 reference photos (give each photo a short name you can use with @ in your prompt).
- Choose a model, resolution, shape and length, write what you want to see, and press Generate video. The price is shown before you press it, and you are charged only after the video has been made and checked.
2. Choose a model and price
The Compare models page shows a sample from each model with its price per second, and what it can do.
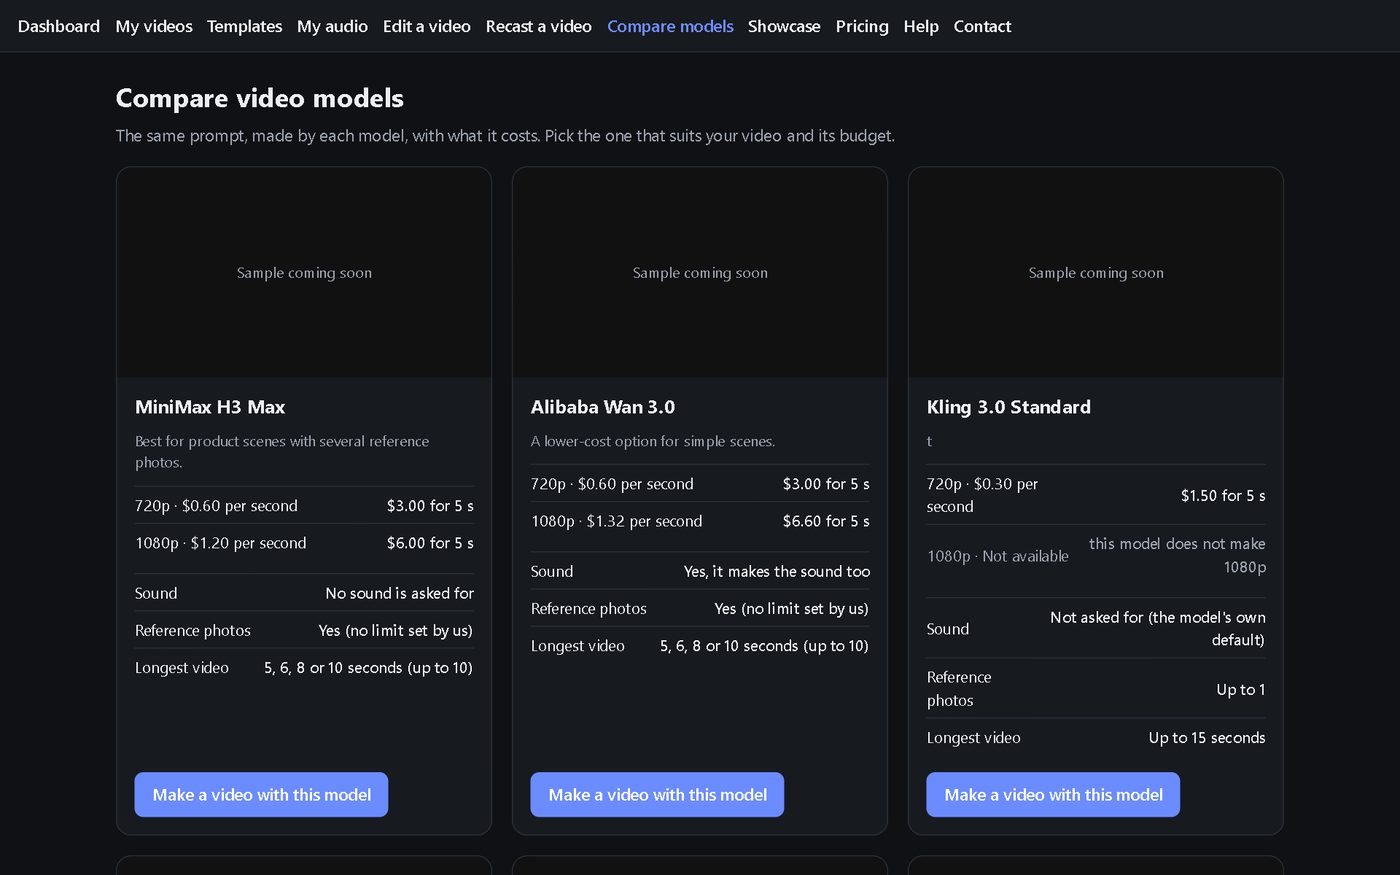
No photos? You can still make a video. Google Veo 3.1 and ByteDance Seedance 2.0 make video from your written description alone: leave every reference photo unticked. MiniMax H3 Max, Alibaba Wan 3.0 and the other reference-photo models also work with no photos ticked. LTX-2.3 and PixVerse V6 are the exceptions: each needs exactly one start photo. If you tick a photo on a text-only model, the form tells you and keeps the Generate video button off.
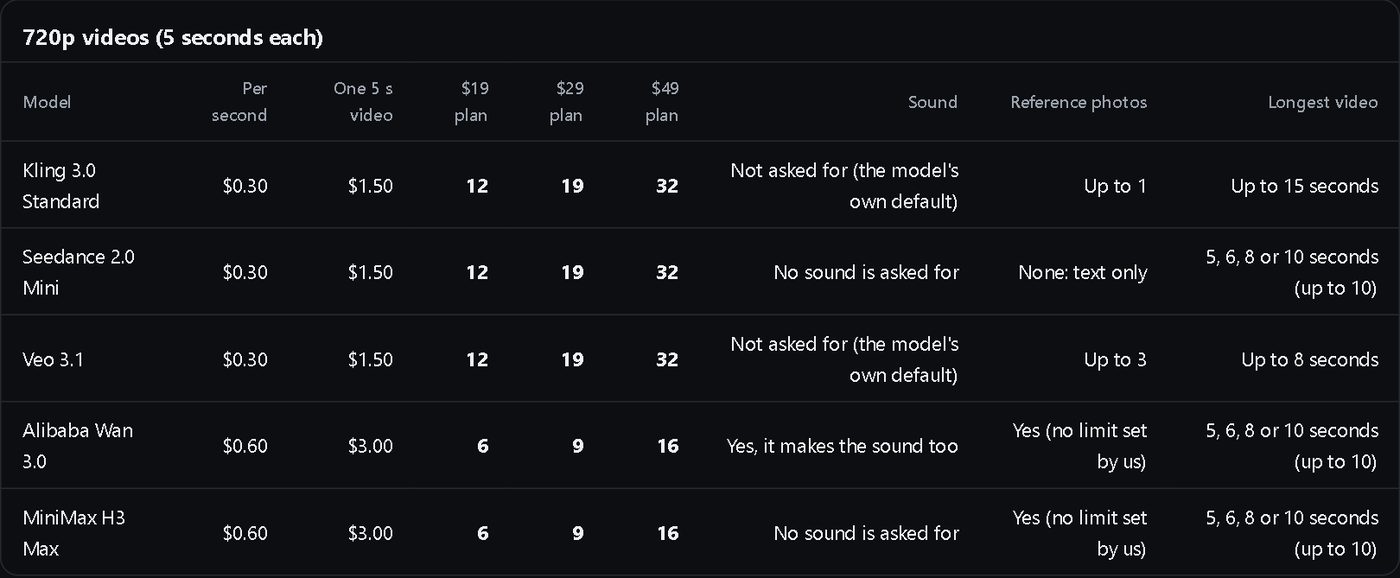
The Pricing page has tables that show how many videos each plan ($19, $29 or $49 of credit) makes with each model.
3. My videos and the 30-day rule
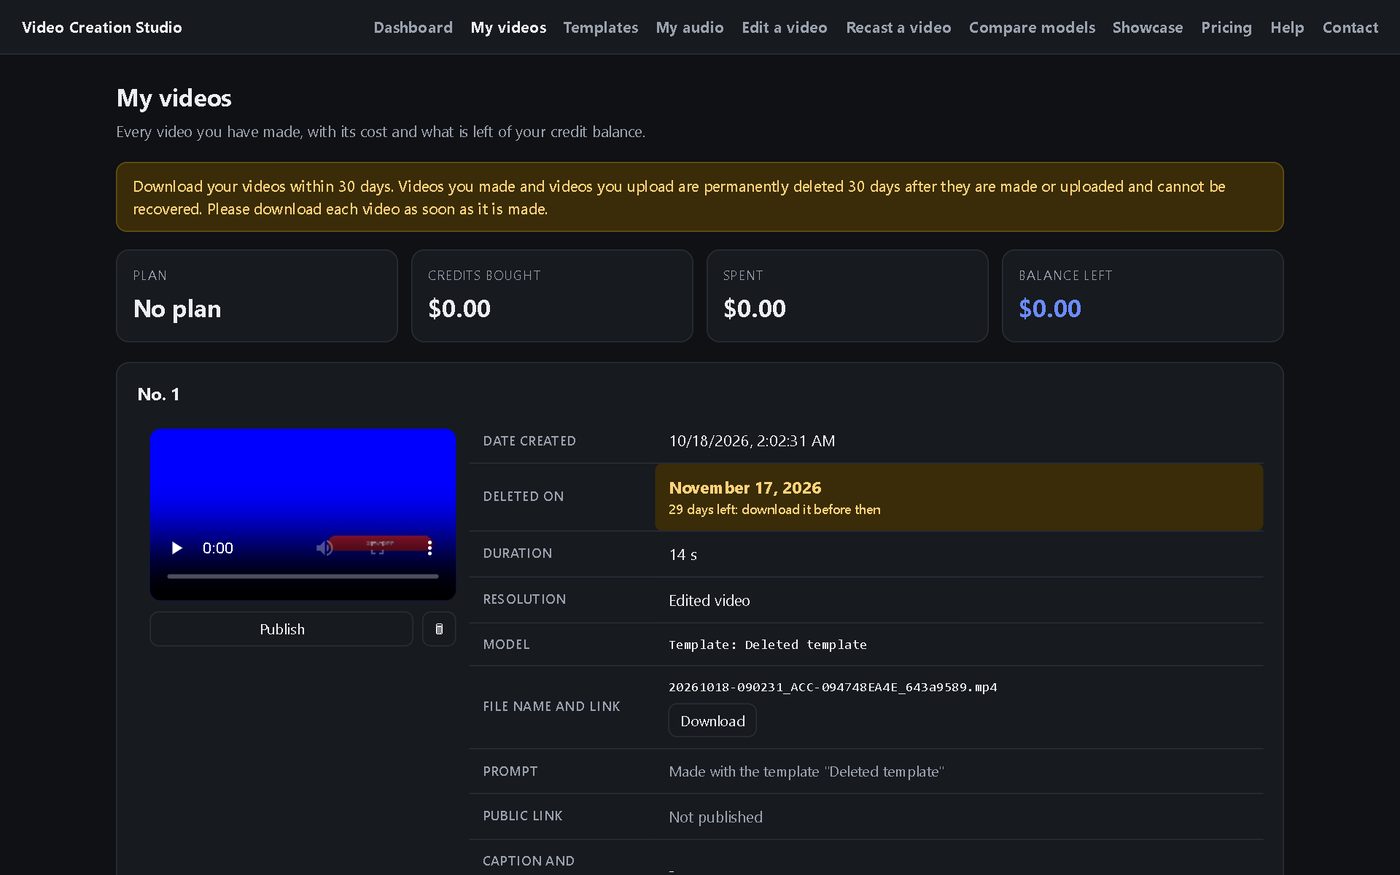
My videos lists every video with its player, details and the Download button. Publish a video to get a public link you can share.
4. Uploaded videos (up to 10)
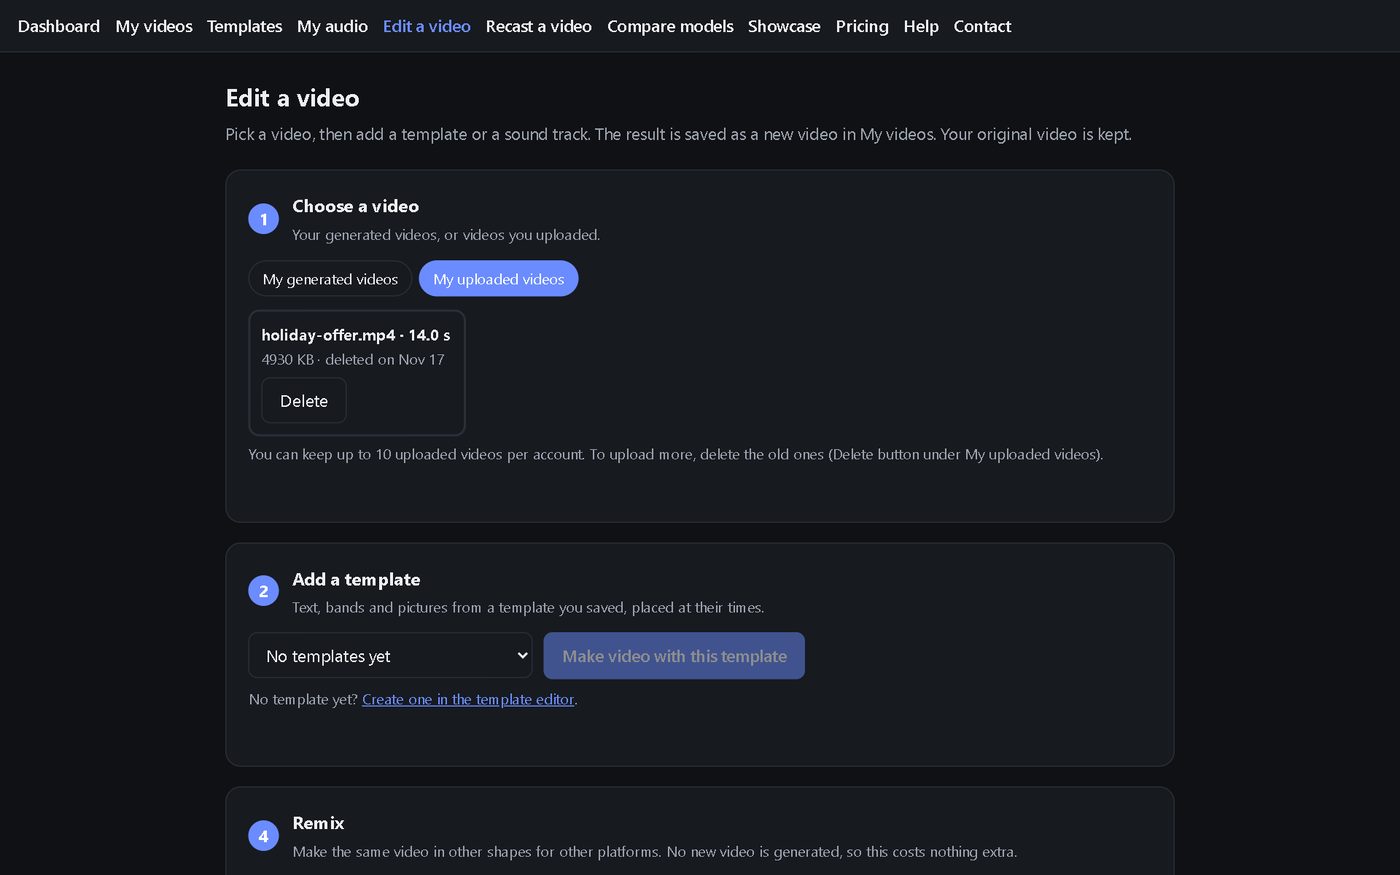
You can keep up to 10 uploaded videos per account. To upload more, delete old ones: open Edit a video, choose My uploaded videos, and press Delete (press it a second time to confirm). Uploaded videos are deleted 30 days after upload, and each shows its deletion date.
5. The template editor
A template is a design that goes over a video: text, offer badges, pictures, bands, a logo, a QR code and cut-outs. Open Templates, choose a video from the menu at the top, and design on top of it.
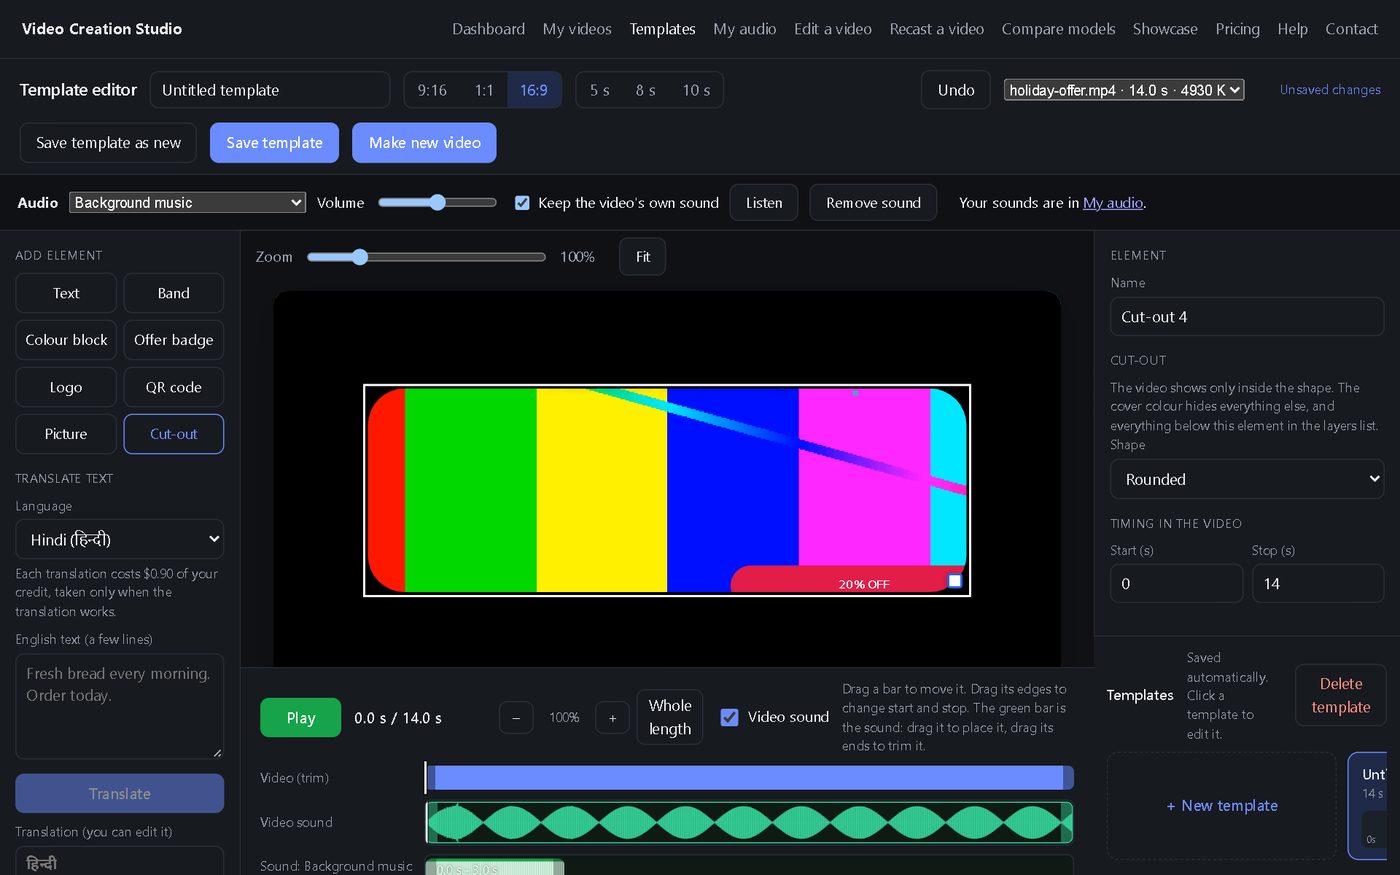
- The video menu lists your uploaded videos first, by file name, then the videos you made.
- The template is saved automatically a moment after each change. You can also press Save template.
- Zoom above the video makes the picture bigger or smaller. Hold Ctrl and turn the mouse wheel over the video to zoom too. Press Fit to go back.
6. Add text, offers and pictures
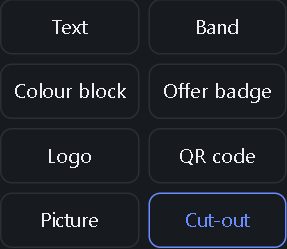
Press a button to add an element, then drag it on the video to move it and drag its corner to resize it. Each element can start and stop at chosen times. An element that runs to the end of the timeline stays until the end of the video.
Text style and angle
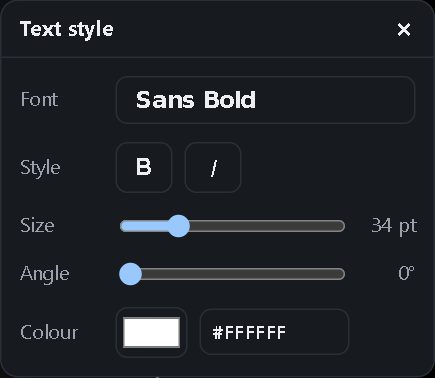
Select a text and its style window opens: font, bold, italic, size, colour and Angle, from −60 to +60 degrees. A positive angle tilts the text upwards to the right, a negative angle tilts it downwards to the right, in the preview and in the finished video.
Offer badges and brush styles
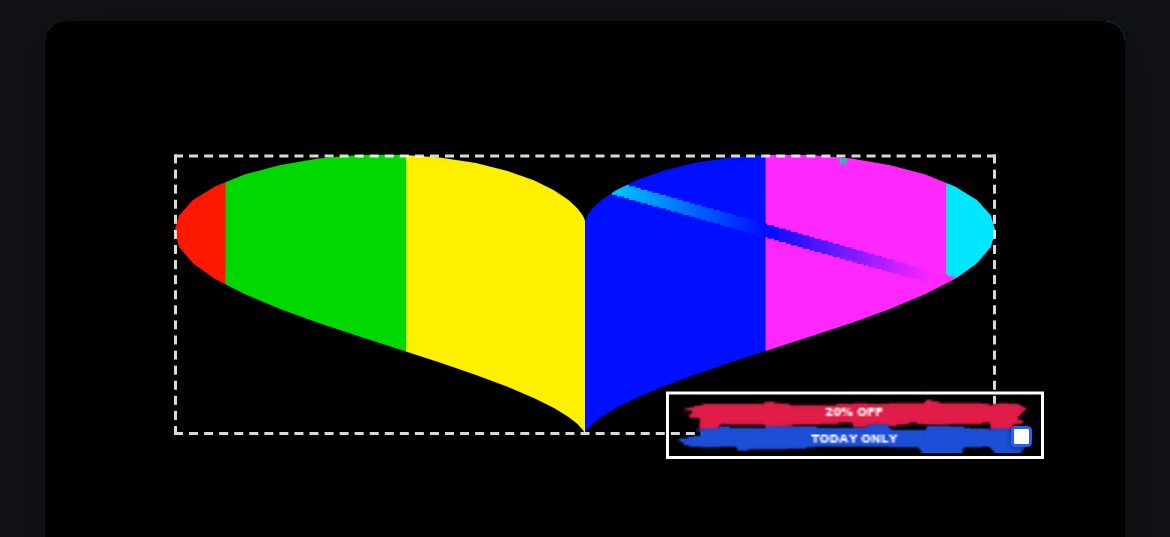
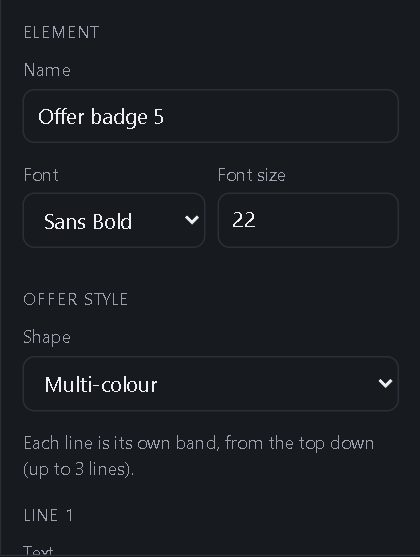
An offer can be a plain pill, a Brush stroke, a Two-colour brush (2 texts) or a Multi-colour badge of up to 3 bands. In two-colour and multi-colour offers the bands touch and work as one badge. Each band has its own text, colours, size and Band style (Brush 1, 2, 3 or Straight bar).
7. Cut-out: show the video in a shape
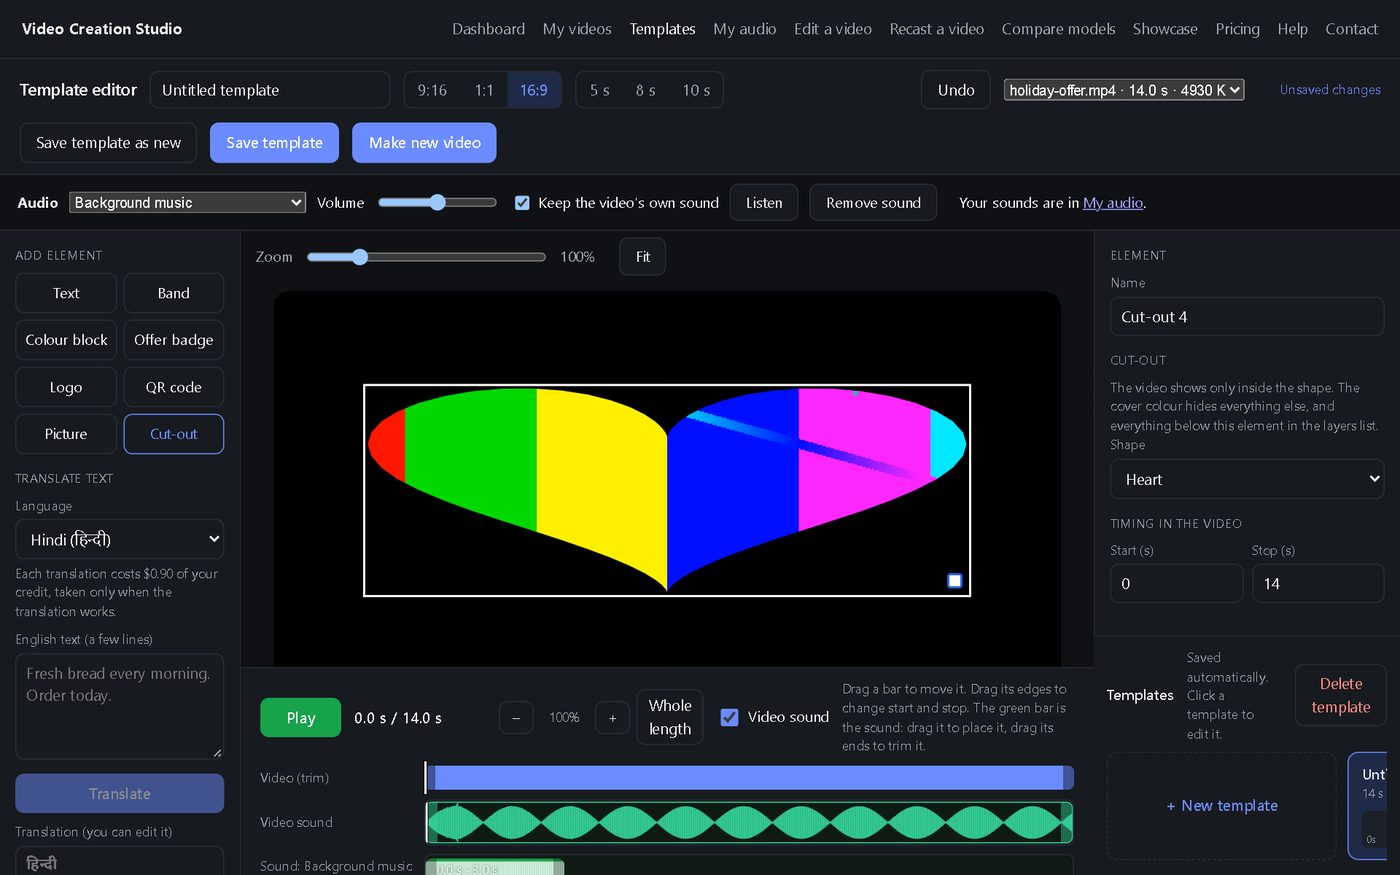
Press Cut-out. The video shows only inside the shape; a cover colour of your choice hides the rest. Choose the shape (rectangle, rounded, circle or oval, triangle, diamond, heart or star), drag it to move it and drag its corner to resize it.
8. Timeline, zoom and length
The timeline below the video has one lane for the video (with its trim handles), one for the video's own sound, one for the sound you added, and one bar for each element.
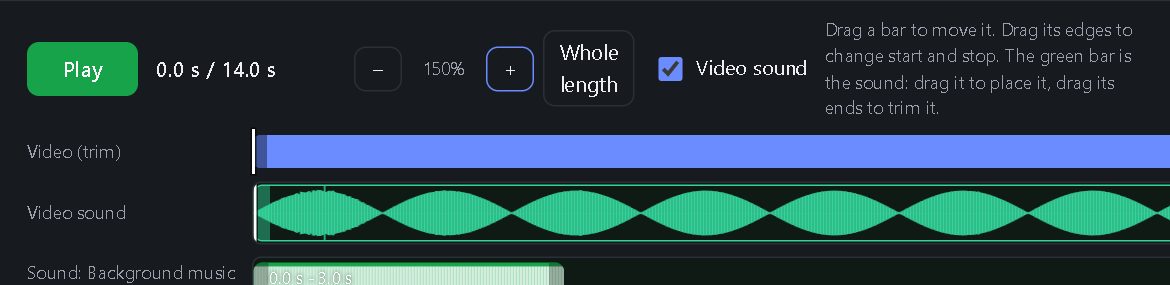
- The timeline is as long as the video that will be made (after your trim or cut). Elements you add run for the whole video unless you shorten them.
- Drag the ends of the blue Video (trim) bar to keep only part of the video. Tick Remove a section from the middle to cut a stretch out.
- Drag a bar to move it, and drag its edges to change when it starts and stops. Hold Ctrl and turn the mouse wheel over the lanes to zoom.
- Stacking order: the top line is in front and the bottom line is at the back. Drag a line by the dots at its left edge, up or down, to change which element is drawn over which. The layers list on the right works the same way.
9. Sound: video sound and added sound

- Added sound: choose a file from My audio (or upload one). It appears as a green bar on its own line under the video sound. Drag the middle to move it and its ends to trim it, and press Delete to remove it.
- Video sound: the video's own sound is drawn as a waveform. Drag its middle to move it earlier or later and its ends to trim it. A faint shadow shows where it was, and Reset video sound puts it back.
- The Video sound box keeps or removes the video's own sound, in the preview and in the video you make.
- Your audio files in My audio are never deleted automatically.
10. Indian languages and translation
All nine languages (Hindi, Marathi, Bengali, Gujarati, Punjabi, Tamil, Telugu, Kannada and Malayalam) work in the finished video, with the right font and correctly joined letters, even if a Latin font is selected. Long text wraps to its box like in the editor.
The Translate text panel on the left translates your English lines into the language you choose. Each translation that works costs the price shown in the panel, and nothing is charged if it fails. Press Add to template to put the translated text on the video.
11. Make the new video
- Choose the video and design your template.
- Press Make new video. The template is saved first, then the new video is made on the server (up to a few minutes: keep the page open).
- The new video appears in My videos. Your original video is kept. Download it straight away.
The picture is encoded at near-lossless quality. When a template draws nothing on the video and cuts nothing, the picture is passed through without being re-encoded.
12. Edit a video, step by step
Open Edit a video from the Create menu. Your original video is always kept, and every result is saved as a new video in My videos. Edits do not use credit.
- Choose a video (step 1). Press My generated videos or My uploaded videos, then click a video's card to select it. You can keep up to 10 uploaded videos; press Delete (twice, to confirm) to make room.
- Add a template (step 2), if you want one. Choose a saved template and press Make video with this template. To design a template or trim the video on a timeline, use the Templates page instead.
- Add audio (step 3), if you want it. Choose an MP3, WAV or M4A file (up to 20 MB) or one from My audio. Drag the sound along the video to choose where it starts, set the volume, and untick Keep the video's own sound to replace the original. Press Play selection to listen, then Add audio to video.
- Remix (step 4), if you want other shapes. Tick 9:16, 1:1 and/or 16:9, and the shorter cut if you want a half-length version, then press Make versions.
- Cut and join (step 5), if you want to trim or combine. Press Add the video from step 1, drag the ends of its piece to choose what it keeps, add pieces of other videos the same way, then press Make the cut. Pieces are joined in the order shown.
- Get your new video. When "Your new video is ready" appears, press Open My videos to play and download it, or Edit another to start again. Download it within 30 days.
13. Froyla CloneVoice: features and settings
Clone your voice, or use an AI voice, and turn one photo into a lip-synced talking video. Open Froyla CloneVoice from the top menu, or go straight to its own address, clonevoice.froyla.com. It has its own pages and its own list of videos, and it uses the same account and the same credit as video.froyla.com. You sign in on each address separately.
What you can do
- Clone your own voice from about a minute of recording. A live verification phrase makes sure it is your voice. Cloning is for paid accounts.
- Use an AI voice (AI Female or AI Male) with no recording. Every account can.
- 22 languages, including Hindi, Malayalam, Tamil, Telugu, Bengali, Marathi, Gujarati, Punjabi and Kannada.
- Three video styles: Expressive, Precise lip-sync, and Presenter (you describe the gestures, for example a teacher giving a lecture).
- Write in English, speak another language: the Translate button in the Studio turns your English script into the language you chose.
- Your photos and voices stay yours: rename or delete any of them at any time.
- One Menu on every page: the Menu button at the top right opens Studio, My voices, My avatars, My videos, Usage help, Help and costs, Safety, and Froyla Reels.
- Help on the page: Usage help walks you through your first video, Help and costs lists every charge and has a question box, and Safety and consent explains the rules. The complete help page is at clonevoice.froyla.com/audio/help.
Clone a voice, step by step
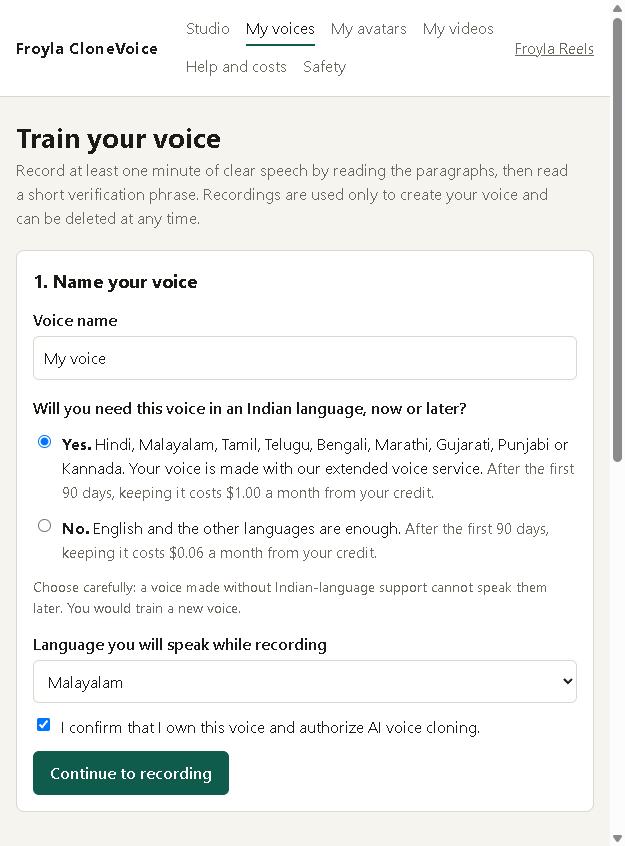
This picture shows the older header with links across the top. Those links are now in the Menu button at the top right.
- Name your voice. Up to 60 characters. You can rename it later.
- Answer the Indian-language question. Yes makes your voice with our extended voice service, which speaks all 22 languages, Indian languages included. No uses the standard service, which speaks 13 languages and costs less to keep. You cannot change this later: a voice made with No cannot speak Indian languages, and you would train a new voice.
- Choose the language you will record in. The list shows the languages of the service you picked.
- Tick the consent box and press Continue to recording. Your browser asks once to use the microphone.
- Record at least 60 seconds. Read the paragraphs on screen. English and Spanish have ready-made paragraphs; in other languages, read any text aloud. Each recording is checked, and the page tells you what to fix (too quiet, too noisy, clipped or too fast).
- Read the verification phrase exactly as shown, including the five-digit code. It proves the voice is yours.
- Press Train. The price is shown first and is taken from your credit. After a minute or two the voice shows Ready on My voices.
Writing in English for another language
The Studio speaks your script exactly as you type it, in the language you choose. It does not translate on its own.
- Type your script in English in the script box.
- Choose the language you want the video in.
- Press "Translate my English into ..." under the script box. The button shows the price first. The button is hidden when the language is English.
- Read the translation. It replaces the text in the box. It is a machine translation, so read it and fix anything before you render. Back to my English puts your English text back.
Settings at a glance
| Setting | Choices | What it does |
|---|---|---|
| Voice name | Up to 60 characters | How the voice appears in My voices and the Studio. Rename it any time. |
| Indian-language support | Yes or No, chosen when you create the voice | Yes: 22 languages. No: 13 languages. A voice made with No shows a "No Indian languages" label in My voices and in the Studio. It cannot be changed later. |
| Recording language | The languages of the service you picked | The language you read your recording in. English and Spanish have ready-made paragraphs. |
| Voice (in the Studio) | My voices, AI Female, AI Male | An AI voice uses the voice service that speaks the language you pick. If your own voice cannot speak that language, the Studio uses an AI voice and tells you so. |
| Language (in the Studio) | All 22 languages | The language of your script. Every language is offered; the voice service follows it. |
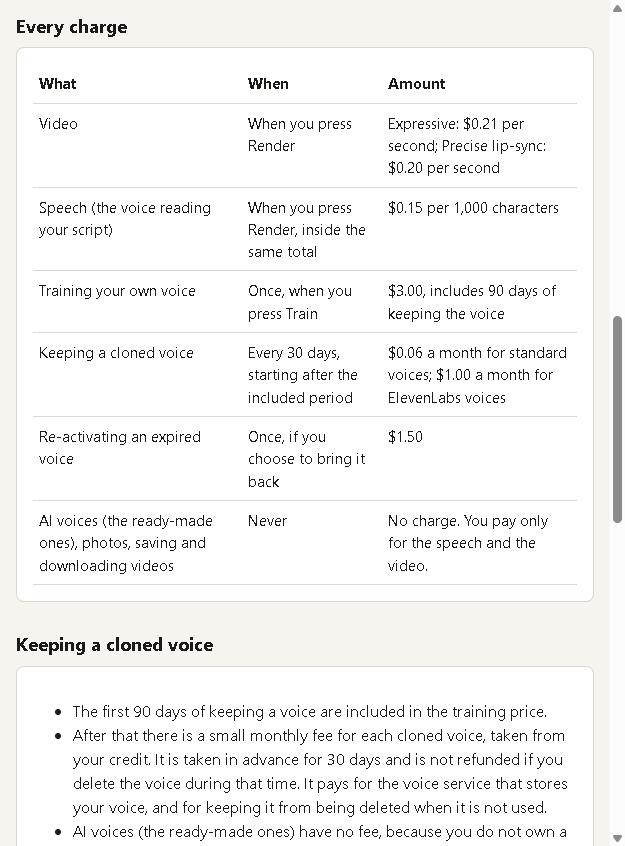
| Video option | Expressive, Precise lip-sync, or Presenter (gestures) | Expressive moves the head, face and hands, for up to 29 seconds of speech. Precise lip-sync keeps the photo as it is, matches the lips very closely, and takes longer scripts. Presenter shows a box where you describe how the person moves (gestures, posture, a lecture style; no walking), for up to 59 seconds. Currently Expressive costs $0.21 per second, Precise lip-sync $0.20 and Presenter $0.24. |
| Script length | Follows the video option | The character limit under the script box changes with the option. The Studio counts about 15 characters per second of speech and keeps a little room spare, so Expressive allows about 390 characters. |
| Translate (in the Studio) | Any language except English | Turns your English script into the chosen language. Charged by the number of words, at least $0.01, only when the translation comes back. Back to my English undoes it. |
| Resolution | Original | Set by the video model; there is no choice to make. |
| Keeping a voice | The first 90 days are included; then a monthly fee | The fee is shown on the cloning page and under each voice in My voices, and is taken from your credit every 30 days. |
| An expired voice | 30 days to decide | If your credit is too low when a month is due, the voice expires. Your recordings are kept for 30 days: re-activate the voice, or delete it. |